Saturday, February 16, 2013

Banana Cream Sundae

Boy do I have a treat for you guys! This year for Valentine's Day we decided to stay at home and cook a meal together. Lonnie came up with dinner (steak, shrimp, salad, and macaroni and cheese...it was to DIE for!) 


And I came up with dessert!


Now, my husband's favorite dessert is his Mawmaw's banana pudding. Now, we all know that there's no way that I can compete with Mawmaw's banana pudding. I mean come on, it has Mawmaw's Love mixed all in it.


So I wasn't even going to try. Instead I created this...


I am calling it my 'Banana Cream Sundae' and let me tell you...woah. Hold on tight because this is going to be one of the best desserts you have ever tried!

And it's not complicated at all.


Start by collecting a few ingredients. Nilla Wafers, Cool Whip, 1 Banana, White Chocolate Bar (I used Lindt. It must be at room temperature), Banana Cream Pie pudding mix, and a cute glass to put it in!

*Side Note: You could easily make this sugar free or fat free and it would be just as delicious.


First, you'll want to make your banana cream pudding. I used the quick pudding mix. Follow the directions on the box. Once the pudding has set, you'll want to let it cool. Pop it in the freezer if you're in a rush. Just make sure you check on it often so that it does not get to cold. You want it to be about room temperature so that when you fold in the cool whip it will mix well. 

Once the pudding is ready and at room temperature, fold in 1/2 of the cool whip until well mixed.

Now the fun part! Assembly!

Slice your banana into 1/4 slices. I used one banana for two glasses but you can always add more/less. Make sure to save a few banana slices for garnish!


Then add your pudding/cool whip mixture. Try not to touch the edge of the glass. You want to keep the glass as clean as possible. 


Now put your Nilla wafers in a ziploc and smash using a glass, rolling pin, whatever you can find in your kitchen that will crush the wafers. Like so. 

I forget how good Nilla wafers are...I had to sneak a few. MMMmm.


So I made a mistake on this part. You see in the picture below I got so excited to make this puppy that I forgot to sprinkle the Nilla wafers on top of the pudding mixture before I added the cool whip. It won't be as pretty but..it still tastes delicious! But it still makes me sad. I'm all about the pretty...


So if you are following the correct directions you would add the cool whip now. But I had to add the wafers instead. Sigh.


Now this is fun! Make sure your white chocolate is at room temperature. Using a vegetable peeler, create little chocolate curls. It makes me feel so elegant and classy. Look at those pretty curls! 


Lastly, garnish your sundae with a slice of banana and a piece of the white chocolate. All I can say is banana heaven. Sweet Sweet mother of bananas. This dessert drives me bananas (in a good way).

And let me tell you Lonnie absolutely LOVED it!

Now go make you some! You know you want to. It's nanalicious.

Saturday, January 19, 2013

Strawberry Banana Smoothie

I know it's winter.

I know it's freezing outside (well today it's actually in the 60s..crazy I know!)

But sometimes I just get a craving for a smoothie. Today was one of those days.

So here is the recipe for a DELICIOUS strawberry banana smoothie!

1 very ripe banana (this is important. If you don't use a very ripe banana your smoothie will turn foamy in gross.)
1 cup frozen strawberries
1 cup of orange juice of your choice (or any juice)
a squirt or two of agave nectar (or honey)

Throw all of that in a good quality blender and blend it well. You don't want any large chunks of strawberry.

...or do you?

Sometimes I'll even leave out the agave nectar, so the only sugar that you are getting is from the fruit and the orange juice! You may also want to strain the smoothie afterwards if you don't like the strawberry seeds. 

I wonder what would happen if you added some coconut flavoring....

I hope that you enjoy this smoothie as much as I am!

Cheers!


Saturday, January 12, 2013

Meal Planning is the Name of the Game

Boy oh boy do I have something exciting to share with you! 


Last week I gave you a tour of our pantry and how awful it was. And how I fixed that problem. This week I stumbled upon a website that is going to make grocery shopping, meal planning, and organizing so much easier! 


It is called: www.pepperplate.com


This website (and app might I add!) is a place to store and organize recipes that you find online. But not only that....You can create shopping lists, menus, and meal planners! And it's super simple.


Let me show you:


This is my profile. You can see the three categories: recipes, menu, planner, and shopping. First things first, let's add some recipes! 


One of my favorite things to do in my free time is find new recipes online. The problem..where do I keep them if I ever want to use them again? I have finally found a solution! Find your recipe online, copy the url, and place it in blank box and click add.

Easy peasy right?!


You can also add recipe's manually. Nana's pecan pie recipe has been uploaded to a safe (and readable) place!


Pepperplace conveniently gives you a list of websites that they support. Not only are my favorites (pioneer woman's tasty kitchen and foodnetwork) on the list, but there are so many other places that I would have never known to search for recipes! Discovering this list was like discovering presents on Christmas morning.


All of your recipes are stored here under the recipe tab. They even have pretty pictures and list the name of the website where you find them (some even have calorie counts!!)


Next, you can create menus. 

Do I want green beans or corn with my meatloaf? 


Plan out your meals for the next week. And it's not only dinner...lunch and breakfast can be included too!! 

My life is complete.


And of course...we can't forget about the shopping list. Not only is this list interactive (it has check boxes!!!), it also categorizes each item. Your cheese will never again be listed next to your BBQ sauce (what a travesty). You can even add extra items like laundry detergent, dog food, etc. 

Some items the site may not recognize but don't you worry. You can select a category for it.


This website has me all excited to plan our meals and step into the kitchen. I hope that you find it as handy as I do!

Enjoy!


Saturday, January 5, 2013

A New Year, A New Pantry

Along with all of my other normal New Year's Resolutions...you know...the typical


1. Grow and deepen my relationship with Christ (not to understate this resolution. It is definitely #1 on my list this year.)

2. Lose weight (which really will happen this year!)
3. Get into shape 
4. Run a 5k
5. Be a better wife


.....and the list could go on an on! But one of my big resolutions this year is to get my house organized and put together. 


Starting with the pantry. 


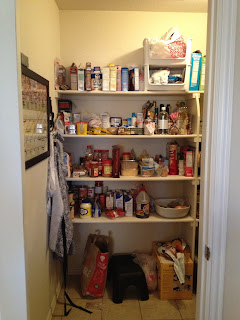
We have a HUGE pantry! And to be honest, we haven't been using it to its full potential. See for yourself.


Can you say scary?!


Hide yo kids, hide yo wife. 

I'm not kidding...

I'd known that my pantry had been scary looking for awhile but with the craziness of this last year, I tended to over look it scrambling to get dinner ready. But since it's the new year and all I thought that I would put my big girl britches on and tackle this monster.

So here it goes!


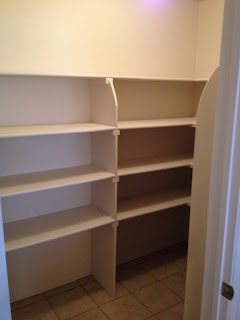
It didn't take long to empty. Really, what took the longest is to find room to place all of the items till I figured out how to organize it.


Callie took this opportunity to sniff out little nuggets of who knows what. Her favorite...the cap of some cheese whiz. Yes, I did throw it away. And the can of cheese whiz. 


Now isn't that purdy? Much better than before! And all it took was some time, patience, and a few organizers from the store. Like the one under the cans to the left of the image and the bins at the top (to hold chips). Lazy susans would also be a good one to use!

I tried to organize everything in categories. All of my rices, pastas, and snacks are on the top shelf. Cans, sauces, vegetables, and breads make up the second shelf. And less used items like oils, seasonings, beverages, and stocks make up the bottom shelf.


On the remaining shelves I put all of our cooking equipment, bake ware, platters, cook books, jars, vases, paper towels, etc. I even made a baking station to the right of this image! It has all of my chocolate chips, flour, shortening etc. 


Needless to say I am super excited to have an organized pantry and I think that it will make cooking even more enjoyable. At the least I can look at it and smile :)


Room one CHECK! Stay tuned for more room updates throughout this year!


Thursday, July 5, 2012

I'm back!  

It's about time I get my fanny in gear and keep this commitment that I made to myself. Who wants to be a failure? Definitely not muah. Failure is for goobers...and I'm no goober! 

Welcome back peeps and peepettes! I hope that this blog will inspire you to do great things! Actually I hope that you will just read it when I post. If you do that, I will be a happy girl.    :)  <----see..happy!

Saturday, December 31, 2011

My New Best Friend

While I was in college I worked at this amazing coffee shop/bookstore on Dickson street in Fayetteville, Arkansas. Let me tell you that this is the perfect job for a student trying to graduate. 


Why you ask?


Because while you work you get FREE COFFEE (or if you're like me FREE ESPRESSO)!! And a discount when you come in during off hours. What could be better?!


Since I've graduated, became a grown-up, and moved 2 hours away, working at this coffee shop is no longer an option. And free espresso is sadly no longer a luxury. 


So, I have been searching and searching for a way to get good espresso without spending a fortune, and finally...I found it! 


She is called..PIXIE. She is a machine made by Nespresso and she's similar to a Keurig but she's not making coffee. She's making espresso. mmmm. 


She is my new best friend.


I think we might run away and elope. 


Well...I'd have to run that by Lonnie first.  I guess. Since he IS  my husband and all. 


Below is the link if you are interested. She is pricier than a keurig, but if espresso is your thing she is much cheaper than a traditional espresso machine and she makes delicious drinks! 


Nespresso Pixie


Merry Christmas to me!

Friday, December 30, 2011

Thank you Pinterest

Thanks to the wonderful world of Pinterest I have found a few DIY projects to keep me busy. Tonight's DIY project has 3 parts: A new larger, more grown up calendar, an "i love you because.." board, and of course a "Honey-Do" list. 


Someone out there had this amazing idea to turn picture frames into functional, practical pieces of art. Genius. I love this person whoever you are. 


If it's practical and functional, I'm all over it. Stationary, office supplies, organizers...


Yes, I have issues. I'm ok with this. Let's say it keeps me sane!


Anyway, below is my attempt at these awesome DIY projects:


Calendar..I need a new dry erase marker. Mine is fading out. To make this I glued (spray adhesive not normal glue-takes care of bubbles and messiness.) scrapbook paper to the back of the frame. I've seen others use fabric as well. I chose paper because it was the quick and easy route. The only issue using paper is there is a seam. It's not hurting my feelings.


"I love you because..." I saw this and thought it was adorable. So many mornings I don't really get the opportunity to talk with Lonnie. A quick I love you and I'm out the door. This gives me one more opportunity to let him now how much I love him.

This is made with the same scrapbook paper. I also added a heart and two love birds.


These boards are placed on our largest kitchen wall next to the fridge.


As soon as I get more sticky picture hanging things, the "Honey-Do" list will go below the "I love you because...". The layout mimics the popular photo collage layouts. 

VIOLA! Functional Art! 

If you haven't joined Pinterest..I URGE you to do it NOW! You don't want to miss out!